
Plastics
It should not be hard to convince anyone the benefit of using plastics
instead of metals for so many applications. Cars, clothes, food containers,
toys - these are all items that have been revolutionized by the invention
of plastics.
Plastic is cheaper, lighter, more corrosion proof, easier to cut and shape
and drill, has a very low thermal conductivity, and a higher strength to weight
ratio than metals. So why isn't your robot made of plastic already?
It is probably because you do not know where you can get large cheap
quantities of the stuff, nor have you actually realized the advantages of it.
HDPE, or High Density PolyEthylene
The type of plastic I will talk about is HDPE. The reason why I choose this
particular white colored plastic over any other is because it is the cheapest,
and yet still has all the good properties you want for a small hobbyist
size robot. HDPE is often used in pipes, shipping pallets, and truck bed liners too.
I really like the material, as I have used it on almost every
robot I have ever made (a lot). HDPE is the perfered choice in material for lightweight robots
due to its affordability, high strength, and easy machinability (power tools not required).
A $20 sheet is all you need for every
structural component on your robot, and you will still have some left over.
So where can you get this stuff from? Go to
McMaster.com
and do a search for HDPE. Then just choose the shape and dimensions you want.
You probably want a thickness big enough that you can put screws into it (1/8"+),
although I have found uses for thinner sheets (such as for curved parts).
Where to Use HDPE
HDPE is a flexible material, so if you plan to have not very wide parts, you may
want to get a thicker piece of it. I tend to use it for the main robot base.
This is because the base is the largest single part on your robot, and could
quite easily be a significant percentage of weight if you used
aluminum or wood.
This is where you would attach your motors and
servos and
electronics and whatever else.
I recommend a 1/4" thick sheet for your base, unless you reinforce it with aluminum
(I will talk about this later).
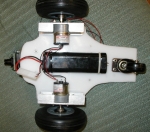
Click the above image to enlarge an example of mounting robot parts to your
HDPE robot base. This was actually my very second robot so it should make a good example
for beginners. It is a
differential drive style robot, implementing
two side DC motors and a castor wheel in back.
What you are viewing is actually the bottom of the robot.
As you can see it is very artistically shaped, showing how easy it is to cut with basic tools.
I used steel brackets to
mount my wheels for high stiffness, using screws between the HDPE and the steel.
At the rear of the robot is the castor, which just required a few screw holes drilled into
the HDPE to attach it. In the front, if you look carefully, is a small camera. I attached
it with a bent piece of aluminum, drilling two holes into the HDPE for screws. Lastly, you
will notice this big black rectangular thing in the center. This is my
NiCad battery. I placed it on the bottom of my robot to keep
the center of mass low to the ground. I used zip ties to attach the battery. But if I was to go back
and redo it, I would have used velcro.
Velcro actually sticks really well to HDPE if done properly. Just take sandpaper and scratch
up the surface a little, blow the dust away, and stick it on. This roughing is for increasing
the surface area for the sticky glue to bond to - a method good for all other glues and
epoxies too.
Designing Your HDPE
As I stressed in my build your first robot tutorial,
you should plan out your robot before building it. This is very important for when
you cut your material, as making a mistake could cost you more money. Whenever I use
HDPE (or sheet aluminum), I first design the shape and mark every hole that gets drilled into it.
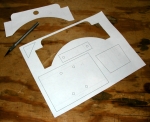
This is the design I used to cut the HDPE for the parts in the image at the top
of this page. Click to enlarge.

Here I used AutoCAD, but you could just as easily have used Paint or Solidworks.
Whatever you have available. I highly recommend 3D CADing if you have the option. Then
just print out the image to scale, cut out the paper parts, and trace them onto your HDPE
(or aluminum or whatever other material) using a dry erase marker.
Dry erase is great as you can easily wipe it off of HDPE when you are done. Permanent markers on
HDPE is . . . well . . . permanent.
As your final step, cut along the lines you drew on the HDPE and drill the holes you marked.
HDPE Construction Techniques
There are some instances where you can use really thin sheets of HDPE, such as when you use
layers or aluminum reinforcement. This below image is an in-construction image
of an omni-wheel robot I completed a few years ago (click to enlarge).

The bottom layer is a thin sheet of flexible aluminum, and the top layer is a thin sheet
of HDPE. Joining them together are four threaded spacers. Servos were mounted
with screws to the aluminum plate, 2 NIMH batteries were velcroed
inside between the plates, and a hole was drilled through
to allow the servo and battery wires to come out to the top. My
microcontroller was then attached to the top using
screws in the corners. I later mounted many other electronics and sensors to the top of
the omni-wheel robot base.
Tools For HDPE
Because HDPE is a highly machinable material, you can use around-the-house tools
to work with it. A Dremel tool would be ideal for drilling and making small cuts.
A fine-toothed hack saw or bandsaw/scrollsaw can easily cut out
shapes. Sandpaper or a belt sander would work for smoothing out the cuts and
for rounding off corners. Any tool that you would normally use for wood can actually
be easier to use with HDPE. Even more amazing, the thinner sheets of HDPE can be cut
with every day scissors and clippers. And for bending HDPE (for thinner
sheets only), just place it on the edge of a table, and use a flat heavy item
(like a book) to push on the part hanging off the edge.
Lastly, Disadvantages in Using HDPE
Yes, plastic is not as magical as we wish. There are several occasions you should
not use HDPE.
- Do not use it when you expect a lot of wear applied to it. HDPE is a soft
material and can easily be worn away with abrasive contact.
However I have seen HDPE used quite well for chain tensioners because of it's
smoothness. Chain tensioners are just a big block of material that pushes against
a moving chain to make the chain tight around the sprockets.
- Do not tap HDPE. This is when you put a screw thread into a material. HDPE is
very weak when it is made thin, so the tapped threads will end up being lose and will fail
after only a few uses. However what is great about HDPE is that is a great self
tapping material. Instead of tapping, just screw a screw into a tight hole and the
screw will stay in really tight and firm. I use this method very often as it is very
reliable.
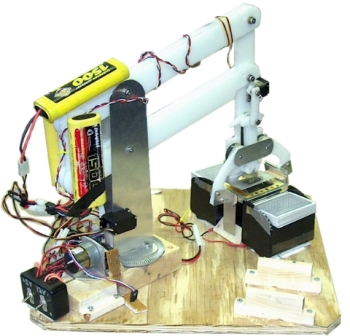
- Do not use HDPE if you need highly rigid strength. HDPE, unless the dimensions
are chosen carefully, will bend and flex. This is likely to happen if you use
long thin pieces to hold heavy weights at the end. It is possible to mathematically calculate
how it will bend so you can design around the problem, but I will not go into it as it
is somewhat complex theory. Below is a robot arm I made with such calculations.
It uses long thin horizontal beams of HDPE, but I used a combination of 4 of them and located
them strategically so the bending was almost zero. This particular robot arm lifted
decks of playing cards, but could easily lift objects much heavier.
| 